


Tapes. I’ve heard many say they aren’t dead. I say, if they aren’t dead, they’re probably zombies. A technology of an era when tapes represented a cheap medium of storage. Today, the best, fastest and cheapest way of backing up involve using inexpensive hard drives. Say, a NAS (Network Attached Storage) device connected to a local area network to backup enterprise data. That’s all great, but one of the core challenges is to create incremental backups to minimize network data transfer. Even better, how about backing up only data that changes (delta) to a NAS device? Let me show you how to do that for free (well, with the exception of having to buy the NAS).
The TechnologyIn the past, the best way to achieve a decent changed-files-only copy of files from a source to a NAS would be to employ tools such as robocopy or hobocopy (on Windows). They work great, but if you have a file that is, say, 3 gigabytes, that file will have to be completely transferred every time.
A holdover from UNIX. Rsync is a network tool and protocol that allows for syncing of files over a network. The beauty of this tool is that it will keep track of the contents of files that need to be synced. Being able to sync only specific data that changed can reduce your overall network-based backup by a significant margin.
The File Host (or the destination)
One of the more elusive pieces of this puzzle (for me) was finding a NAS device that would act as an rsync server. You might think this is easy to find, what a perfect fit for a NAS device right? As it turns out, a feature like this is not readily found or advertised. What I did find was the ReadyNAS line of Netgear NAS has supported this for some time. I’ll describe enabling this on a ReadyNAS device – but if you happen to have a different NAS, the idea is similar too (if your’s supports this).
1. Login to you NAS’ admin interface – most often by way of a web browser
In my case it’s: https://192.168.2.99/admin
2. In the left-side menu click on Services –> Standard Protocols and then scroll all the way down to find rsync. Enable that with the checkbox.

3. Now, go to the Shares menu item and list the shares you have. To the right of your shares, you’ll see an option for rsync.


Now, you’re ready to sync from the source.
The File Sender (or where the source data is located)
This is where things get really nice. Since the rsync tools is so pervasive, you’ll find a command line version of this tool on anything running Linux or Unix. You’ll also find this tool on any Mac OS computer as well. The one Operating System without it? Yes, you guessed it – Windows. It is kind of a Windows world – so I’ll take you through setting up a Windows computer to copy files from shares to an rsync enabled NAS. In an environment with less than five servers, it makes sense to have this running on your Windows Server to copy your data to the NAS (even though it could apply to any Windows machine with data you want to backup).
1. Get the tool – I’ve been impressed with the free Windows tool called DeltaCopy. Grab that here and install it.
2. Run the DeltaCopy Client (and not the server). What you’ll see is a window that looks like the one below. All you need to know is pretty self-explanatory here. You’ll even have a quick way to setup a scheduled task for the process.

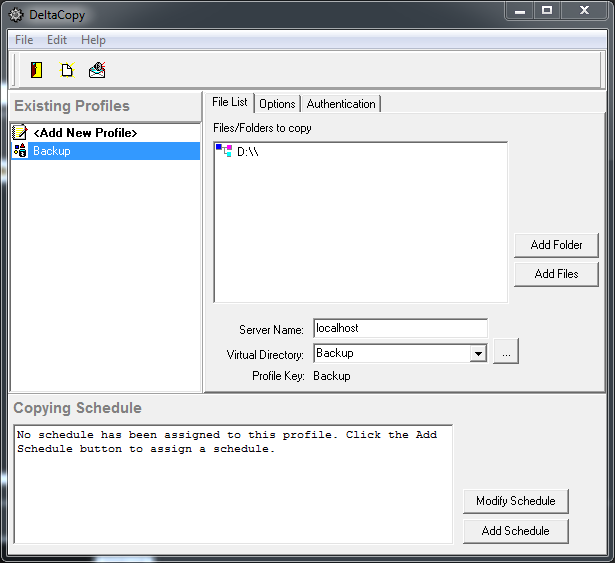
Some things to notice about DeltaCopy:
1. The email notification functions didn’t work well – I tested it with a few servers and it didn’t provide options like SSL, etc.
2. The program let’s you run processes manually so you can see the amount of data transferred. It also let’s you log information.
3. As a bonus, you can get the actual command line DeltaCopy runs (if you’re curious)
Some other scenarios
1. If you search for the rsync option on the ReadyNAS specifically – you’ll find allot of information on doing a NAS to NAS backup. Yes, you can use the versatile rsync tool to make duplicate copies of NAS devices as multiple backups.
2. Taking that duplication further – enable the rsync daemon on your NAS device and do delta file backups over the WAN (or Internet connection). This involves making sure your server is reachable by opening a TCP/IP port for rsync and either having a static IP address or using a dynamic DNS tool (no-ip.com).
3. For clients – to catch the data on client computer devices and sync them directly into a central NAS device would be possible using technology like this. If you were thinking of backing up open files – a possible hobocopy of the open files to an unused local folder – and then rsync all that into the NAS later.
Of all the backup options today – using a bunch of inexpensive disks in a NAS and rsync together is perfect for the Small Business looking to have a quick, reliable and versatile backup option that will hold up over time. Data storage is so cheap now – it just makes sense. If you know of any other NAS devices that support the rsync daemon, please pass that on in the comments. If I find any, I’ll do the same.
Now, when will we see a NAS running the rsync daemon that supports data de-duplication? Hmm.