How To Prepare Bootable USB Drives For Windows/Linux Installations
I have found a number of tutorials on the Internet that describe how to take a regular bootable ISO image and place it on a USB flash drive, but none of them really laid out what utility was needed and what ones won’t work. There are a number of uses for this since most of the newer computers that exists today can boot off of USB drives. If you place your Windows installation disc on a USB drive -installing Windows again is breeze because you don’t have to worry about scratched discs or other related disc reading problems. Also, installing from USB allows you to directly edit files (if you use an answer file or OEM drivers) and you’re installation will be a much faster process than reading off a traditional optical disc. In fact, if your computer doesn’t have a disc drive, it likely does have a USB port that can be booted from.
What won’t work the way you want
To start off, I want to rule out a few utilities you may have come across that won’t work if you looking to setup a bootable USB drive and install your OS. As of the time of this writing, the following are not going to get you where you need to be:
Jolicloud USB Creator – This is a great and simple utility to place your installable Jolicloud image onto a USB disc. It won’t, however, work for any type of disc other than the type Jolicloud provides. It requires a hybrid ISO image as well as lacking a bootmanager for your Windows install. This won’t help you. Use this utility only with Jolicloud.
Xcopy – While copying the contents of the ISO image directly to the USB disc is a good idea – you will need to also prepare the disc to boot (MBR modifications) and build some sort of boot manager to pass the boot process to the Windows installation. Xcopy cannot do this.
An ISO image?
An ISO image is a perfect copy of a CD or DVD disc. When you make a copy of a CD or DVD ROM disc as a file on your computer, this file is called the image file. If you had, for example, downloaded the ISO image of Windows 7/8 Enterprise 90-Day Trial from Microsoft, the file name might be “7600.16385.090713-1255_x86fre_enterprise_en-us_EVAL_Eval_Enterprise-GRMCENEVAL_EN_DVD.iso”
How do I make an ISO image from disc?
There are a number of tutorials on the Internet, I recommend you use the Open Source Windows utility Infrarecorder to create the image. Note: Yes, it’s intended for recording discs, but you don’t need a burner to install an use Infrarecorder to make an ISO image.
Get the USB Drive
You want to get a good USB flash drive for this process. There is quite a selection out there too, so you really can get something with great size for pretty cheap. I would suggest that you get something 3 gigabytes or larger. Your standard Windows 7 installation CD clocks in at 2.4 gigabytes or more in size. You might try something like the Kingston DataTraveler I – 4 GB USB 2.0 Flash Drive.
Gather your ISO image
You either want to create the ISO image from disc (if needed). Or, in the case of something like MSDN you will have directly downloaded the ISO image from Microsoft. Most Linux distributions will allow you to download the installation disc as and ISO image. Download or save all of these ISO files for the Operating Systems you want to use on a directory that is easily accessible. You will need space for all of this too, be sure to leave 50 or more gigabytes of space to work with.
Preparing a Windows 7, Vista or XP install from a USB drive
Get The WinSetupFromUSB utility. You can get that here.
Start off by extracting the entire directory structure from the ISO file. For the DVD-ROM based disc (like Windows 7) you’ll need a utility like Isobuster to read and extract files. Next, re-partition and format the USB stick with the utility name “Bootice” or “RMPrepUSB” (provided). Once you have the program configured correctly click on the start button to finish the USB stick. In most cases you’ll want to choose the default options whenever preparing your USB stick.
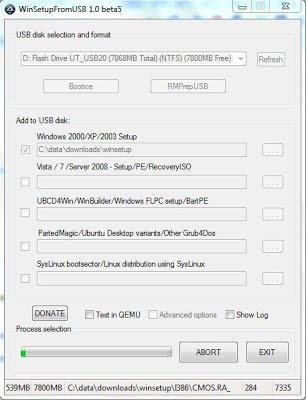 |
| WinSetupFromUSB in action |
To create the Windows XP Installation I did the following:
a. Insert the USB key and load WinSetupFromUSB, be sure that it is recognized.
b. Use the bootice utility provided (second button along the top). You will see a window that looks like the one shown below. There aren’t many options, just click on Process MBR to setup the USB drive
c. Return to WinSetupFromUSB, choose the folder when your extracted Windows XP ISO files are (using the first option shown above), and then click on the “GO” button.
To create the Windows 7 Installation, I did the following:
a. Insert the USB key and load WinSetupFromUSB, be sure that it is recognized.
b. Use the RMPrepUSB utility provided (second button along the top). You will see a window that looks like the one provided below. Choose the options laid out in this image. If this program is updated or changed in the future, try to match what you see below with the interface provided.
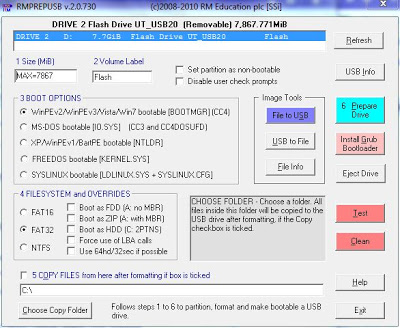 |
| RMPrepUSB Utility |
c. If you haven’t done so, be sure to copy the contents of “filesgrub4dos” to the “filestools” folder so that RMprepUSB can see and use the Grub Bootloader
d. Highlight your USB stick and Click on “Prepare Drive” (this will format it)e. Click on “Install Grub Bootloader” to install the boot manager onto the USB stick f. Return to WinSetupFromUSB, choose the folder when your extracted Windows 7 ISO files are (using the second option), and then click on the “GO” button.
Things that may go wrong:You get the error: “error 15 file not found”This happens if the file “bootmgr” from the root of your Windows 7 Installation ISO file is not copied to the root of your USB drive. In most cases, you can simply just copy that file to the root of the USB drive to get setup running.
You get multiple setup options in the Grub Bootloader. You probably installed the bootloader more than once, go back and start again and make sure you start or create a cleanly formatted USB drive.
Linux installation from a USB Drive (preparing it in Windows)
For Linux-Based ISO images, use the UNetbootin tool. You can download this utility here and run it on Windows or Linux. Since this is a graphical utility, you just need to run the file you downloaded.
 |
| The UNetbootin-408 utility |
Once running, you choose the “Diskimage” option and choose the ISO drop down option. Next, browse to the location of your ISO file. Be sure that along the bottom type is “USB Drive” and the drive letter coincides with what your system detected when you inserted your USB drive. Click OK to start the process.
Using the two above ways, you can create USB flash disk installers for all your most commonly used Operating Systems, even Windows PE – but that would be another post. Questions? Thoughts?