Creating DLLS in Delphi
Learn how to create a DLL file and use the Win32 API to gather information
After deciding it was time for me to explore the process of making a DLL file in Delphi, I started to think about where this might be applied. I decided a DLL would be the perfect solution to my problem. I needed the ability to create a system information utility that was reusable in Windows. A DLL as defined in the Delphi (v5) help files:
“A dynamic-link library (DLL) is a collection of routines that can be called by applications and by other DLLs. Like units, DLLs contain sharable code or resources. But a DLL is a separately compiled executable that is linked at runtime to the programs that use it.”
If that paragraph was a little rough on you, the main reason I wanted to use a DLL was the concept of “shareable code or resources”. If you think about it, Windows should be that modular. I wanted make a utility available that would display system information in two modes. The first mode would require a dialog box that shows a tabbed interface and various nuggets of system information. The second mode would create a file and write this system information directly to a file. The application I modeled this behavior around is a small program I pulled from a game CD. Its seems it was written as a test diagnostic tool, but it contained all of the functionality I wanted except for the following limitations:
- The program is not free, so I could not distribute it
- The program is not modular enough to support attaching to other applications, it has a facility to run externally but many features are missing.
- A limited command-line support
- No support for applications such as login scripts (UNC)
I have included four screen shots of the application that I would model my DLL project after. I intend to provide all of the features of the test application, as well as adding a few more. This article will describe the process taken to create this project and use it with a simple application (Also created in Delphi).
First Step: create the dll
Creating DLLs is built-in to Delphi. This means that you can create a DLL by choosing File – New… and selecting DLL from the choices that are displayed on-screen. Some of the obvious things that are different are that Delphi replaces the “program project1” with “library project1”. The other major difference is the lack of a Form by default. Later on, I will be adding a form to this DLL and displaying it. Since the main purpose of this DLL is to run code, I will have to create at least one unit and one form. When you have created a .dll project, save it under the name of kesysinf for future reference.
Create the unit and exported function
Here, you will add a Form to the DLL project. Do this by choosing File – New Form. You will notice that Delphi will create a Form (Form1) and a new Unit (For now named Unit1). To do this, you must open the kesysinf project in Delphi and choose File – New Form. You will notice that Delphi creates a new form and also a new unit file. When this happens you should see the following actions take place in Delphi:
- You see a form open in the Delphi environment (IDE)
- You see a new Unit (Unit1) template open in the Delphi IDE
- You see a uses entry in the project source the uses entry looks like Unit1 in ‘Unit1.pas’ {Form1}
At this point I would suggest you save the project and all files. I decided to name my unit main and my project kesysinf. For clarity, I would suggest you do this, but you can name your form and project anything. Also, one limitation of Delphi is that you cannot have more than one form referenced in a Unit. This means, as you add forms to your project, you will be forced to add a new unit.
The exported function we will call _GetSysInfo will take one string parameter. I want this function to allow the DLL to decide weather to create a file on disk or display a dialog for confirmation. This function can be placed in the project file or the unit file. In this case I decided to keep everything out of the project file and use the main unit. Inside main you should see the standard declarations, the first step is to create the function that will run in the DLL. Start off by placing the following just below the implementation and {$R *.DFM} (if there is one) section:
procedure _GetSysInfo(FuncParams: Pchar);
begin
ShowMessage(FuncParams);
end;

exports
_GetSysInfo;
This procedure that I created will take a Pchar (for memory reasons), not return anything and only show a message on the screen that is the parameter passed to it. The other piece of code of interest here is the exports section. This is crucial for a Windows DLL. This will make the function _GetSysInfo available to any application that would like to call it. Now, compile the project and create your DLL file. The next step is to open the directory where the project is stored and use the built-in Windows utility called Quick-View to see your exported function (This is to visualize the concept). Just right-click on your DLL file and choose Quick View from the context menu. Scroll down to see the following information:
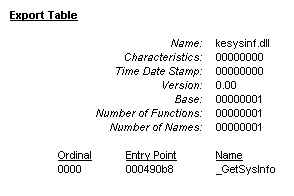
You will notice under the export table that your function is available in the DLL and ready to use by other applications.
Load the DLL with an application
Now that we have created the DLL file, the next step is to create a simple application that will run the DLL function _GetSysInfo for a basic test. The first thing you need to do is Close All open files in Delphi and start a new application File – New Application. In this new application, the Form will not be useful, so choose Project – Remove From Project – and choose Unit1 – Form1 and select OK. For our purposes, this application will only need to “Import” the DLL function and call it. A form will not be required. After the Form is gone Choose Project – View Source from the main menu to open the project’s source file in the main window.
At this point you should be looking at a blank project source file like the following:
program keapp;
uses
Forms;

{$R *.RES}

begin
Application.Initialize;
Application.Run;
end.
I decided to call this program keapp and save it in the same directory as my kesysinf.dll file. This keeps from getting things confused at a later time. Of course, you can name this simple program anything you’d like.
Start off by removing the Application.Initialize; and Application.Run; lines. These are not useful. Then, add a declaration after the uses section and call the function between begin and end. Your completed project file should be similar to the following:
program keapp;
uses
Forms, SysUtils, dialogs;

function _GetSysInfo(S: Pchar):string; external 'kesysinf.dll';
{$R *.RES}

begin
_GetSysInfo(Pchar('filemode'))
end.
Using the function declaration above causes Delphi to load the DLL file once and reference the function called _GetSysInfo to the DLL file referenced after the external directive. In the example above I have named my DLL kesysinf.dll. If you have used another name, place it here. I have also added two uses clauses for string operations and to support the ShowMessage() function.
Compile this program and run it (make sure the kesysinf.dll is in the same directory) and when you run keapp.exe you have a working Windows DLL file.
Making Use of the new form
Now that you have a DLL project (kesysinf) and an application to run the DLL (keapp), the next step is to find a way to display this form on the screen, and add some useful functions to the form. In this section we will learn how to break the source down to three sections, the first section will be to gather information, the second section will be to save the information gathered to a file, and the third section will be to display this information to a form. It is important that a structure be added to this program for easier workability.
Structure the Code
Previously, our kesysinf unit (main) held only the following code:
unit main;
interface

uses
Windows, Messages, SysUtils, Classes, Graphics, Controls, Forms, Dialogs;

type
TForm1 = class(TForm)
private
{ Private declarations }
public
{ Public declarations }
end;

var
Form1: TForm1;

implementation
{$R *.DFM}
procedure _GetSysInfo(FuncParams: Pchar);

begin
ShowMessage(FuncParams);
end;

exports
_GetSysInfo;
end.
You want point out a few areas for your own interest, first the area below var is crucial. This is where the variables will be declared that will be used by all of your main sections. You will want to create all the variables here. For the first example we will add variable for the computer name (string) and call it nbSysName (after NETBIOS System name). Add nbSysName : string; below Form1: Tform;. The next step will be to break the code up into our three sections. All of these sections will be dictated by the value passed to the _GetSysInfo function. After the three sections are created you should see:
unit main;
interface

uses
Windows, Messages, SysUtils, Classes, Graphics, Controls, Forms, Dialogs;

type
TForm1 = class(TForm)
private
{ Private declarations }
public
{ Public declarations }
end;

// Important: Global Variables Here..
//

var
Form1: TForm1;
nbSysName : string;

implementation
{$R *.DFM}
procedure _GetSysInfo(FuncParams: Pchar); begin

//Information Gathering Section…
//
nbSysName := 'SystemName';

// File Mode Below…
//

if FuncParams = 'filemode' then
begin
SHowMessage('Function ' + FuncParams + ' running');
end;

// Dialog Mode below…
//

if FuncParams = 'dialogmode' then
begin
Application.CreateForm(TForm1, Form1); Form1.ShowModal;
end;

end;

exports
_GetSysInfo;

procedure TForm1.FormCreate(Sender: TObject);
begin
Form1.Caption := 'System Information - ' + nbSysName;
end;

End.
So let’s look at the additions to this code. First off the ‘//’ in the code are standard comment blocks that you might have remembered from C++. Delphi also supports {} comment blocks. In the global variables section we added the nbSysName variable that will be used for the system name. Next, the variable will be assigned a value in the Information Gathering section. This happens when the nbSyName := ‘SystemName’; is called. Next, we added the File Mode section. All this section will serve to do is check the FuncParam (sent to the _GetSysInfo function) and check if the string passed is ‘filemode’. If this is true, then the file mode section will place a simple message on the screen. This is a temporary measure for us to separate blocks of code now. Later, we will add functionality to this section. The next section added is the Dialog mode section. This section (like the File Mode section) checks the FuncParam and decides to run it’s code based on this. If FuncParam is ‘dialogmode’ then the DLL will create the form Using the Application.Createform method and then show the form using the ShowModal method. Please note, your DLL will cause an error if you try to show the dialog using the Show method instead of the ShowModal method.
Now we have three sections, the Information Gathering, File Mode, and Dialog Mode section. Since we have a Form, the way we change attributes of the form is by coding events in the form. To do this, double-click on the form in the Delphi IDE and you will be taken automatically to the Tform1.FormCreate() function. In this function we’ll just add a simple statement that changes the caption of the Form using the nbSysName global variable. After that compile the DLL project.
Setup the keapp project for dialog mode
The next step is to close the kesysinf project and open the keapp project and set it up for dialog mode. Your keapp project source code should have been like this:
program keapp;

uses
Forms, SysUtils, dialogs;

function _GetSysInfo(S: Pchar):string; external 'kesysinf.dll';

{$R *.RES}

begin
_GetSysInfo(Pchar('filemode'));
end.
Where it says _GetSysInfo(Pchar(‘filemode’)); change the filemode string to dialogmode. After this you can compile your keapp project and run it. You should see the dialog from the kesysinf.dll file load and display on the form’s title bar the following string:
System Information – SystemName
Getting the Windows version
The first piece of information we want to get is the Version of Windows that we are running. To do this we need to call a Windows API function called GetVersionEx(). This function is your typical Windows API function. It makes use of a “Structure” that is predefined in Windows. Delphi supports these structures but not in the fashion described in the API reference help files provided by Microsoft. For this reason, it can be a little tricky to make use of these functions.
In the Windows API reference, the OS version information structure is called OSVERSIONINFO. In Delphi, this structure is referred to as Tosversioninfo. With that, we can get the version information and make use of this structure to do so. Before calling GetVersionEx you need declare the following variables in the global variable section:
VerInfo: TOSVersionInfo;
WinPlatform,WinVersion: string;
The following code should be placed in the Information Gathering section:
VerInfo.dwOSVersionInfoSize := SizeOf(TOSVersionInfo);
GetVersionEx(VerInfo);

case VerInfo.dwPlatformId of
VER_PLATFORM_WIN32s: WinPlatform := 'Win 32s under Windows 3.1';
VER_PLATFORM_WIN32_WINDOWS: WinPlatform := 'Windows 95';
VER_PLATFORM_WIN32_NT: WinPlatform := 'Windows NT';
end;

WinVersion := WinPlatform + ' Version ' + IntToStr(VerInfo.dwMajorVersion) + '.' + IntToStr(VerInfo.dwMinorVersion) + Verinfo.szCSDVersion;
The line that includes VerInfo.dwOSVersionInfoSize is required for this function to work. As Microsoft describes it, it seems they need the size to process the allocation of memory. The next step is to call the function. After this we can use the elements of the structure to get the information needed. The .dwPlatformId structure member holds the platform information (I used the built-in Delphi Placeholders, these are actually numbers). The next statement is quite long and really just places all the information (Including the WinPlatform contents) into one string we can use to place the string on our form or in our file. In this example I used dwMajorVersion (In the case of Windows 95 – 4), dwMinorVersion (in the case of Windows 95, 0) and the szCSDVersion that passes a string related to the operating system in question (In Windows 95b the string passed is B). There is also an element called dwBuildNumber that requires some more advanced bitwise operations. I think you should give it a try, if you’re up to the challenge. In a future article I will describe bitwise operations in the string-driven Delphi Environment.
Now, we need to place this information on our Form. To do this, place a label on your form and change the Caption property to Windows Version. Next to this, place an editbox on the form. Then, All you need to do is place the following line in the FormCreate() function of the main.pas unit file:
Edit1.Text := WinVersion;
Compile, Run and test your Windows version.
Creating the filemode
When we created the DialogMode and FileMode, the purpose was to have two modes to run (based on parameters) in the kesysinf.dll. The Dialog mode was to display information in a Dialog Box, and the FileMode was to create a file with all the same information in a clean, formatted Plain Text file. This file may be useful for logging system settings or taking computer inventory. If you notice in your Main.Pas file you should find the following sections:
// File Mode Below…
//

if FuncParams = 'filemode' then
begin
SHowMessage('Function ' + FuncParams + ' running');
end;

// Dialog Mode below…
//

if FuncParams = 'dialogmode' then
begin
Application.CreateForm(TForm1, Form1);
Form1.ShowModal;
end;
Under FileMode, there is a simple check for the parameter and a ShowMessage() call that displays a message to the user. Between begin and end is where all of the FileMode work will be done. We need to (a) open the file with the SystemName and create variables, (b) write the version of Windows to the file. To Start, we need to add a textfile declaration in the Global Variable section of our code:
logfileh: Textfile;
The name of the variable will be logfileh and it is of the type TextFileh. After this, we can create the actual file that will be placed on the hard disk. The file should be created in the Information Gathering section because this allows our application to create this file in FileMode and also create the file based on the user pressing a button on our Dialog Box (if you decide to add this feature). I will let you try that later, for now let’s create the file:
AssignFile(logfileh,getcurrentdir()+ '\' + nbSysName + '.txt');
rewrite(logfileh);
AssignFile assigns a file handle to the variable logfileh and takes a string parameter as the filename. In this example, I build the string, I get the current directory, add a ‘\’ to the end of this string (Yes, you are right, if the file is at the root of the drive it will not work. there is a function for that.), on that I add the name of the system and then tack on ‘.txt’ to the end of the file name string. This entire string represents the fully qualified path of the file. The ReWrite procedure creates a new file and opens it. In this example we will open a new file and write to it. You may also use the Append function to write to the end of a file if you wish. For our example we’ll use ReWrite. After opening the file, we’ll write the following lines:
writeln(logfileh,'Logfile Opened ' + datetostr(date)+' '+timetostr(time));
writeln(logfileh,WinVersion);
To write to a file (Text) we are using the writeln() function. In the first line of code above I’m writing to the logfileh variable and placing a built string in the file that is made up of (a) ‘LogFile Opened’, (b) The current Date, converted to a string, (c) the current Time converted to a string. The next line written, Writes the Windows Version we gathered previously.
After this, close the file:
closefile(logfileh);
This is all we need to create a simple file that contains the date, time and the version of the Operating System. Compile your kesysinf.dll project, go back to keapp and call your .dll using the ‘FileMode’ parameter and test your .dll.
Keapp enhancements
One of the things you may want to do is to make Keapp run .dll by using command line parameters. The following code achieves this:
param1 := Paramstr(1);
param1 := strlower(Pchar(param1));

Delete(param1,1,1);
if Param1 = 'filemode' then
_GetSysInfo(Pchar('filemode'))
else if Param1 = '?' then
ShowMessage('Application Options: -dialogmode [Run in Dialog Mode], -filemode [Run in File Mode], -? [This message] ')
else
_GetSysInfo(Pchar('dialogmode'))
You might want to dissect this code a little more, but the core of the operation is achieved by and if… else statement that displays help text or runs the .dll project based on parameters supplied to keapp. With the above code the following options are true:
keapp /? : Help Message
keapp /filemode : Run .dll in FileMode
keapp /dialogmode : Run .dll in DialogMode
keapp (No Parameters) : Run .dll in DialogMode
Create DLLs
After this article you should have a firm understanding of the function of .DLL files, how to create and use .DLL files, and how Delphi supports the creation of these files. Also introduced, are API concepts that allow you to gather information about the version of Windows running. This should allow you to create a larger application that can display or save system information that can be added to applications for support or other usage.
The classes referenced in this article (and the demonstration applications described in the sidebar) were available for download as file a0001.exe.