Basics: Get A Screenshot With The Same Hotkey On Mac And Windows
I take lots and lots of screenshots on all the platforms I use. One of the best platforms for screenshots, however, is the Mac. You may know that on the OS X platform, a region-based screenshot is extremely easy to do with a Command-Shift-4 keyboard shortcut. Nothing like that exists on Windows (except for the print screen key). I’ll show you how to use a simple utility to recreate that same shortcut on Windows.
The creation of screenshots on a computer is such a common task that essentially every Operating System now includes some way of doing it. If you tend to use all sorts of systems, you’ll find that taking screenshots can be a real pain when you have to install software every time. The best way (I’ve found) would be to use the same shortcuts on every Operating System with the easiest and fastest method possible. What I’m after here is speed and simplicity across platforms; not necessarily the biggest and best software.
The OS X Way
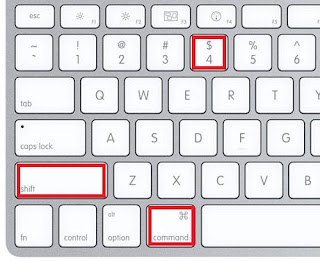
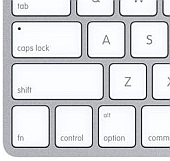
The method built-in to Apple’s OS X is probably the best I’ve seen. Not only do you not need to install any software to use it – the keyboard shortcuts are easily accessible from anywhere in the Operating System. The Command+Shit+4 is also pretty easy to get at with one hand quickly. Considering the most common screenshot I use is the Region Copy, this is what I do on the Mac. I decided I would make this work in a similar fashion on Windows.
Windows
The included Windows ability to take screenshots is to press the PRINTSCREEN key on your keyboard and the ensuing screenshot of the desktop is placed in the clipboard. Using the ALT key will get you the active Window. Once done with that, you’d use something like the included MsPaint to paste that image and then crop and save as you see fit. You can be sure that, from Windows XP to Vista to 7, this keyboard shortcut is going to work faithfully.
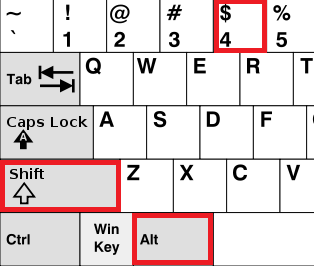
If we want to create a similar process on the PC, we would likely use the above keys as a screenshot shortcut – namely ALT+SHIFT+4. Usually the ALT key is just to the left of the spacebar where the COMMAND key seems to always be located on the Mac keyboard.
Option #1 – CloudShot
I wanted to use the small, free utility called CloudShot on Windows. You can use CloudShot to take screenshots and have them automatically placed in DropBox – but the core functionality I’m after is it’s simple interface and ability to map a shortcut.
After you have downloaded and installed CloudShot (Note: on XP – DotNet 3.5 is required), right click on the small could icon in your system tray and choose “Settings”. In my case, I decided to place the images on the Desktop, but you may choose to place them anywhere you’d like.
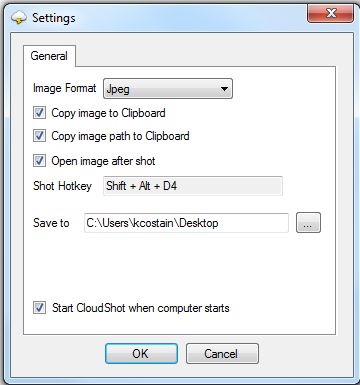
You also want to choose the shortcut keys while on the main window of CloudShot. To do this, simply type the SHIFT+ALT+4 keys and you’ll see the “Shot Hotkey” change to the above image. Click OK, and you’re done.
Problems – Fixed
Well, as I was looking at the above utility and testing it.. I found a serious problem in the file saving process. At first I thought it was the computer I was using, but as I continued to test – it appeared like a serious issue. I even took the time to test a number of scenarios on different Operating Systems and pass it on to the author. The great news is the author indeed fixed the problem.
Option #2 – LightScreen
If CloudShot doesn’t work for you – LightScreen is another options for screenshots. The free and open source utility is simple, lightweight and does exactly what we need. You can download the utility here (as an installer). You’ll have to keep in mind that, to do what we need, you’ll have to change a registry setting. Here’s how we do this:
1. Download and install LightScreen
2. Open the options window and set what options you’d like. Then, go to the “Hotkeys” tab, turn on “Capture a screen area” and then click on the button that says “Ctrl+Print”
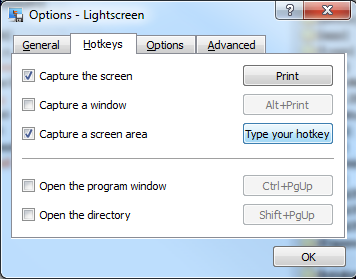
You’ll see “Type your hotkey” – here is where you type SHIFT+ALT+4. You’ll see on the screen that it says SHIFT+ALT+$ – this is what we’ll fix in the registry.
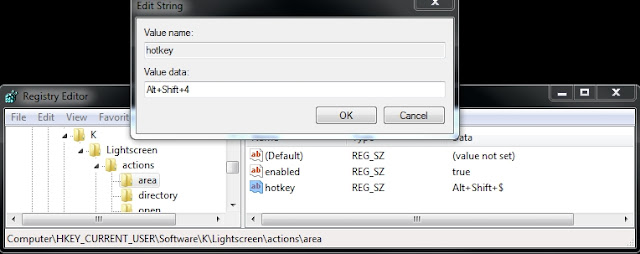
3. Close LightScreen. Open your registry editor and navigate to HKEY_CURRENT_USER\Software\K\Lightscreen\actions\area and change the “hotkey” value from Alt+Shift+$ to Alt+Shift+4. That’s it! Save it. and then open LightScreen again.
So there you have it – I’ve been using CloudShot, but you may choose to use LightScreen (perhaps even LightScreen is corrected to avoid the registry edits). It can be said that working with free software, you get some pain – but these workarounds aren’t too painful. The end-result is being able to use the same natural keys to get a screenshot while on Windows or a Mac to take screenshots of a region. As an added bonus – you’ll find that both CloudShot and LightScreen work with more than one monitor.