Moving/Copying User Profiles In Windows
If you are an IT guy/girl yourself and you handle Windows computers on a daily basis, you’ll likely be very familiar with Windows profiles. If you’ve ever had user login issues, file corruption, migrations to perform or upgrades - you will have worked with them (even if you didn’t know). Given that the user is directly connected to the use of a profile; making sure they get what they need will save you lots of stress. I’m going to discuss the ways you can most efficiently create, copy and replace profiles on Windows so your users always have a consistent experience. Also note, I’m sure none of what I’ll describe to you is supported by Microsoft. Be warned that changes outlined here may cause data loss if you aren’t careful. So, be careful.
Windows XP
First, a refresher on possibly the best (or worst?) version of Windows when it comes to managing user profiles.
Profile Location:
In Windows XP, they were generally located in the C:Documents and Settings%username% folder on a Windows XP installation. Below that folder there were a number of sub-folders with the main user registry file being USER.DAT.
On-the-fly Profile Creation:
The classic method of creating a user profile in Windows XP is simply to log in as that user. The profile is created and can be used from that point forward. To create that profile without logging off and back in as the user you created, try using the RUNAS command, in a shell prompt window:
(as a local user) runas /user:administrator cmd OR
(in a domain) runas /user:DOMAINadministrator cmd
To see this process in action, take a look at this video (Fullscreen Suggested):
Useful for:
This process is most useful if you have copied the user profile you’re trying to create from another location and wish to create a basic profile and then overwrite that basic profile with what you have. Using this process can save you a great deal of time on a local computer or in a domain. This process can also be used to move a user from one domain to another. You can expect to save up to 50% of the logoff and logins if you do this.
Profile Extraction or copy
This process can be quite a challenge. You want to get the users’ profile, but you don’t want to take the time to copy every single temporary file that can be located in a users’ profile. This is how you do it:
- Reboot the computer - this will ensure your target user’s profile is not loaded at the time you wish to copy it.
- Make sure you have an alternate account (other than the user you want access to) with administrator privileges This is often the local administrator account or a domain administrator account in an active directory. if you have too, create this account before the above reboot to save a step.
- Click on Start - Run - sysdm.cpl to run Control Panel’s System applet.
[
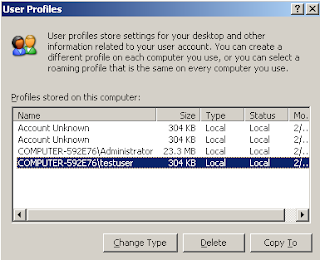
- Click on the “Advanced” Tab and the “Settings” button under User Profiles
- Click on the user’s profile you want to copy (to highlight it) and then click the “Copy To” button
- You’ll be presented with a window that asks where you’d like to place the copied profile - I usually place it in an easy-to-find location like c:user-profile. be sure to leave the box that says “who can use profile” empty. Click ok, and let it work away.
What you’ll be left with in the c:user-profile folder is the user’s profile, minus some very space consuming pieces like the user’s entire “local settings” folder. Since this folder does contain useful files and information (such as Outlook PST files) and Outlook Express email - you’ll want to go into the original profile and extract what information you might have missed. Once done, you now have a copy of the user’s profile that is at it’s most compact and useful. Used with the above “Create Profile” steps - you have the ability to migrate or upgrade a users computer quickly and efficiently. SOme settings, such as stored passwords, will not be retained.
Windows 7
Yes, I skip Windows Vista because, well, no one likes that version of Windows. Truth is, Vista really was the point where a new profile setup was introduced. This would later be enhanced with Windows 7. Perhaps the most perplexing (for more than just myself) is that the “Copy To” function of a user profile was completely removed with Windows 7. This very useful function was turned off without notice from Microsoft.
Profile Location:
Gone was the “C:\Documents and Settings” folder and it was replaced with “C:\Users” and a hard link to the old name.
Profile Creation
So, creating a user profile in a fast and simple manner is exactly the same in Windows 7 as it is in Windows XP. The RUNAS command (mentioned above) is still used to create the user from an admin account (then later, if you wish overwrite that profile). Here’s a video of how this looks on Windows 7:
Profile Extraction or Copy
So, with this feature removed in Windows 7, what ways to we have to extract that user’s profile (for backup or later use?). You’re best to use Windows Easy Transfer, covered here, to handle extraction and copy. if you want to do it manually - here’s how you do it.
One method is to use a utility called Windows Enabler. The utility allows you to enable the greyed out “Copy to…” option in Windows 7 that restricts you from copying away the profile. There are some specifics to the process, so take a look at a quick video walkthrough of it:
If you are not going to use WinEnabler - what you’ll have to do to extract this profile on Windows 7 is this rather messy process:
1. Be sure you’re target user’s profile is not loaded (reboot if you aren’t sure)
2. Log in as an alternate user with administrator privileges
3. You may also need to correct permissions on various files inside of that profile before the copy, then copy that users profile away from the C:Users folder, but be sure to leave out AppDataLocal and AppDataLocalLow
4. Load regedit and open that user’s NTUSER.DAT file (as another hive) and correct permissions for use with a target user (if required). Unload that hive.
5. Go back over the profile and make sure you didn’t leave any files out. Scan both the original profile and the copied profile to ensure the right number of files have been copied.
Profile Replacement
What does all of this lead you to? When you can create a base profile and extract previously used profiles you have the basis for most of your needs when managing users and computers, but you will sometimes need to overwrite (or replace profiles). Why?
Here are a few reasons:
- You have installed a new server and domain (wishing to create the new domain clean). You, need to find the most painless way possible to take all of the OLD domain’s user profiles and migrate them into the new domain while preserving as many of the files an settings the users expect.
- Your users’ computer has crashed and it may have possibly been a drive failure or other hardware failure. you want to gather as much of the users’ profile as possible to create that user’s environment as closely as possible on a new computer.
- You are working in a WORKGROUP/HOMEGROUP environment that requires a large number of trivial user changes, but want the easiest way to make the user profiles portable.
- You wish to make a profile that the user has been using for sometime a part of the “Default” profile on that computer
Trouble is, there is no known acceptable (or working) method of doing this. I have found that profile replacement in Windows 7 can indeed be a messy process. It appears as though there is information stored in the profile folders, that when not correct, forces Windows 7 not to load that user’s profile. The best method to handle profile replacement is Windows Easy Transfer.
Windows 8 / Windows 10
These two versions introduced a number of new ways to manage profiles and remove many of these things we used to use. The Easy Transfer tool has been completely removed here. Shortly, I’ll add more details from my experiences in the field.
Windows Easy Transfer
Included with Windows 7 is a tool for working with, or migrating profiles. You’ll find Easy Transfer is built-in to Windows 7 and can be downloaded for Windows XP (verification required). One serious caveat is that you can do a profile transfer from within Windows 7 machines, but it’s not possible with Windows XP. Easy Transfer on Windows XP will only extract the user, not import.
Using Transfer is fairly simple, be sure to copy the user alone and any files and place that on an external or network drive. This creates a single file (with the .MIG extension) that can be used on the target machine.
Here are some scenarios Windows Easy Transfer will work with:
1. Copy out a user’s profile and settings to an external or local folder as a single file (Windows 7/XP)
2. Copy out user’s profile and settings to an external folder on Windows 7, join a domain, import the user’s profile and settings on the same computer (while assigning the new domain username) on Windows 7.
3. Copy out user’s profile and settings to an external folder on Windows 7, import that profile into a new computer running Windows 7
Note: one of the nicer features of Easy Transfer is that it also includes the user’s Microsoft Outlook profile and PST files (that are not included with a Control Panel -> System copy). Will this exist in Windows 8? Let’s hope so, and let’s hope it’s more flexible. Be sure to save settings information for when you log into the profile. You’ll need to save Outlook mail settings use the great Mail Passview tool for that. If you have customized settings for other applications, be sure to use the save settings facility for them too (For example: The Solidworks’ “Copy Settings” tool)
Update: The problem of icon positions on the desktop
I have found that icon position on desktop of the newly created profile is one nagging issue (Windows Easy Transfer will migrate icon locations). Generally, when you migrate all the information, the icons are not returned to the same locations as before - a user preference that some users will wish they didn’t lose.
Thankfully, I found a utility to get around this problem - it’s called the Icon Configuration utility and it’s simple function is to save the name and co-ordinates of a profile’s desktop icon layout. The file it creates - 001_profilename.icf - needs to be saved in an alternate location and then used in the new profile to restore the new layout. You can find more about this freeware utility at funk.eu.
Update When to do what\ I’ve made a number of changes as this article continues to evolve. I’ve added more details about Windows Easy Transfer and how that works. You’ll hopefully find the article clearer about when to use what process when migrating profiles.
That’s it for now. Many of us in IT find that profiles are a true nuisance on Windows. When you compare that to what’s possible with the OSx and migration, there is a real, serious disconnect. Windows has been around long enough to have these kinds of features, but somehow with every version we get new features, and lose others that worked.
I would love to hear your experiences with user profiles on Windows. What do you use to move profiles around, create them, copy them and possibly how you might use them on the network? I have omitted some of the larger issues of profiles including mandatory and roaming profiles. Perhaps in another blog post.