The strange regression of Unifi and its NVR
“How about Unifi? Have you tried their new NVR?” I asked, hoping my friend was aware of the pattern.
“For sure. I haven’t tried the new NVR, but I’ve been wondering about Protect. I understand it only runs on Unifi hardware. Something’s changing. It’s like the products are more.. amateur.”
“It’s true. Unifi-only hardware and very few options for more complicated setups.”
And so it goes. Another discussion with a fellow I.T. industry friend as we discuss a particular feeling about Unifi. Could it be that the company in decline? Some of Unifi’s newest products would suggest a real shift in how they operate, and not in good ways. The first sign of this is, of course, the further closing off od Unifi’s camera systems. At first, it only Unifi software (UVC-NVR) that could make use of Unifi cameras. The software ran on Windows and Linux computers and ran fine (far better on Linux). With a PC, you’d have all the options the base-operating system exposed, so many of us built servers with multiple network cards and sometimes managed 80+ cameras. The system worked even though it caused pain (port forwarding and the NVR interface being two big ones). Unifi dabbled in the hardware/software integration waters with its NVR product, but that was only intended for small-scale scenarios.
Next, Unifi Protect was released with a new generation of cameras. This system improved on some problems in the previous release. Gone was the port forwarding headache, replaced by WebRTC. Gone was the pain caused while trying to scrub for action with a new timing directly integrated into the product. Sure, this new stuff created more problems (downloading clips is awkward), but on the whole, it seemed to herald a new, better future for administering Unifi cameras.
Over time, it became clear that Protect could not be downloaded. This would only run on Unifi hardware. This seemed to a move to further lock-in customers to buying the things that Unifi made. For a time, there was only one product available: UniFi Cloud Key Plus. So, we used it with Unifi cameras. I’ve installed several Cloud Key Plus’s, and they work well. It’s a tight, clean package. But, for the camera ecosystem, Unifi seemed to be shortsighted. Why release something new and server such a minute part of your client base? They needed bigger NVRs if they were going to serve clients that actually use cameras.
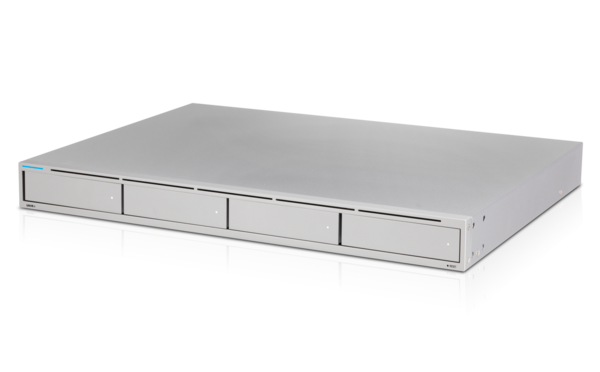
First came the Dream Machine Pro, a product that tried to do everything. This runs software from the defunct Talk to Access to, of course, Protect. Given the Dream Machine Pro includes only one drive bay, that continued to limit the size and scale of cameras attached to this device. Unifi needed to offer a real NVR, and the UNVR-4 would fulfill this promise, or was it?
I finally managed to get an Unifi NVR.
View this post on Instagram
Ewww, something new from @uieverywhere :) Wondering how WD purple drives will do in this bad boy.
This thing appeared to be designed to evade any sense that it was built for business. Let me take you into the issues I encountered while setting up. Given a robust product, these issues would have been uncovered, and I’d have moved on to the next thing. But, because of Unifi’s extremely minimalist design, getting at details was difficult.
First, the NVR needed at least one drive, so I supplied the WD121PURZ, a 12TB WD Purple hard drive (no SMR) meant for surveillance use. Unknown to me, however, was that this drive was faulty. The drive as it was contained an unreasonable number of bad sectors. With the NVR up and its web interface loaded, I started the setup process. Immediately, the NVR shows an error “Can’t connect to the Internet.”
I’m thinking, ok, because of the cloud, it needs the internet. Maybe I could just set up offline? No chance. I then check the Internet, and it’s fine. What gives? The gravity of this situation quickly strikes me: This NVR is doing something to determine what “internet access” is, and I can’t find that out. The error shown is useless, so I have to SSH into the base Linux installation of the device. Doing that yields thousands of lines of logs I could look for. This is a needle in a very badly designed haystack. After some searching, I learned the NVR was pinging OpenDNS servers.
You see, this current network is set up with what’s called a stateful firewall. This means that my network only lets out traffic required for users, and in this case, the ICMP port was not available1. With this mystery solved and feeling very uneasy about this product, I opened up that outbound port and continued the setup. I hadn’t yet seen anything about the drive. I wondered if the product would offer me a screen where I’d format the drive.
The next setup screen show was a cloud login. Having several other protect NVR’s, I’d be adding this one to an existing account. The setup offered another error: “Sorry, can’t log in to your account.” I’m again mystified. This time though, I know this NVR isn’t playing nice, so I expect the worst. Going back to the SSH shell, there are two things of note. The date and time are way off. I correct it. The login still fails. I guess that, oh, this probably needs access to NTP servers to set time/date on the fly or fail. I open that port up but still cannot log in.
At the same time, the NVR is automatically trying to format and RAID my drives. Since only one drive is installed, there’s no RAID involved. But, yes. Automatic. Nothing could go wrong there. I wonder if this device actually requires a working formatted drive to actually log in. Who knows? This isn’t good.
This leads to continued setup failures where the interface spits out a link to a ton of log files or resets the defaults, and you go back to the beginning. I decided to dig into the logs and see what’s up with the drive. The setup interface offers zero help here. Remember, this hard drive is brand new. The log that helped was dmesg. This showed that the NVR was seeing the drive but could not read or format it.
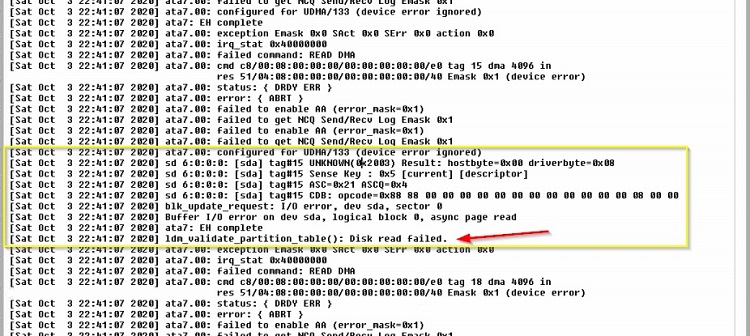
With this, I pulled the drive, transplanted it to a Windows computer, ran diagnostics and determined the drive was bad. The replacement drive worked fine. I’m now working on this setup for an entire day. The NVR can get a date, it can ping, and now it has storage. The setup was going to work.
Nope.
I’m waving my hands in the air like a cop’s pointing a gun at me. Is this thing ever going to work? I go back to digging into the logs. Documentation is precariously thin on how to deal with the setup process problems. The list of ports provided by Unifi says nothing about directionality. The unfortunate naming of this NVR so similar to the older NVR mixes in your search results, only adding to the frustration. A sentence in the above document mentions this: “Ability to establish outbound UDP connections on ports 0 – 65535 (no need to port forward).” This damn NVR needs the use of every single outbound port. They don’t say why. They don’t say what for. But, if you’re using a stateful firewall, you are going to have a hell of a time setting up this device.
Later, I’d understand that this is for WebRTC. It makes accessing the NVR without forwarding ports super easy. Once I gave this device full access to outbound ports, the setup worked, and the NVR became usable.
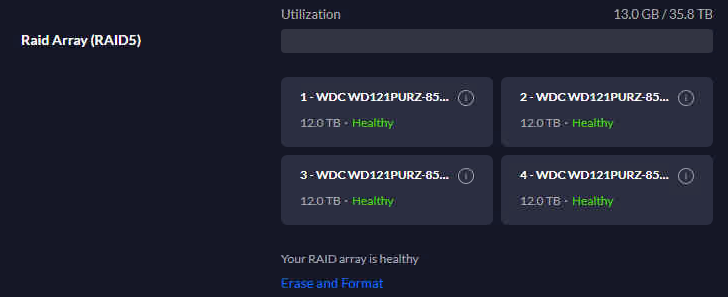
An update: The plan was to use four 12TB Western Digital drives. Once a single drive was functioning, the NVR ran with a RAID 0, all done automatically. Once a second drive went in (hot-plugged), the system immediately attempted to create a RAID1. Then I installed the third and fourth drive. Unifi’s NVR stopped at the RAID1 and showed only two drives in the interface. After using the “Erase and format” command (shown below), all drives were formatted automatically and displayed as expected. If you actually had data on these drives, you might be forced to do some of this work via ssh. Now, I have a working base with the NVR. The next step is to get two network cards working on two different subnets.
Multi-Homing update: The final piece to this setup was getting the NVR talking to two networks. One network housed a few cameras, while a second held all of the base cameras. The larger camera base was to sit on the SFP port. After some trial and error, I used an ASF-10G-T RJ45 SFP+ adapter on the NVR side and plugged directly into a port on a UniFi 16 POE-150W switch. On the switch end, I turned off POE and forced 1gbs full-duplex. On the NVR, I also forced 1gbs with this command.
ethtool -s enp0s2 speed 1000 duplex full autoneg on
With that link up, my next step was to set up a static IP address on that port. Since the NVR forces a gateway address in the UI (again, amateur), I had to drop back to the shell and remove that added route (192.168.33.1 in the example below), or the NVR would stay offline. It looked something like this:
route del -net 0.0.0.0 gw 192.168.33.1 netmask 0.0.0.0 dev enp0s2
This experience left me to wonder if Unifi is sliding backward in quality. Perhaps their product designers weren’t able to think large enough to include the possibility of failed drives or stateful firewalls. In many ways, the work they’ve done around the Protect design seems like a regression from previous work. The good news: They can improve the product. Hopefully, they see our experiences and make the kinds of changes needed to make this product better. For the sake of all of us, Unifi, let us use protect on our servers. Build us a kick-ass docker container, and we’ll be eternally grateful.
- Inbound ports are also controlled, but that’s a typical firewall. ↩︎