The easy (and free) way to increase storage Google Mail while creating a searchable archive
The cloud isn’t always your friend. Google, for example, seems to imbue its entire system with pay-for-storage incentives. Two easy clicks and you can pay money just to hold onto older mail. But, maybe you don’t need them to store your old mail. Maybe you can do this on your own, simply and easily. You already have the computer, use it. And, let’s face it, do you really want to pay Google more money?
These instructions are also focused on a Windows environment (right now). If you use macOS, you can run a Windows Virtual Machine or search for a method of storing and searching through .mbox files.
Exporting your Gmail into a living archive:
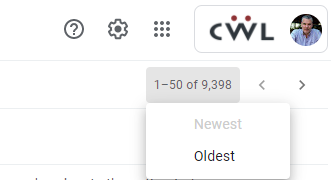
1. Find your oldest message. Just go into Google Mail, Inbox and look for your name on the top-right side. There’s a “1 of xx” number. Click on that and choose “Oldest.” This is going to show you the very oldest messages. This is the year you want to start archiving.
Note: I chose to archive by full year because it’s a decent amount of data while being organized enough when you later search your archive. You can adjust this as you see fit.
2. If you haven’t created an empty label in Gmail called “Export.” This has to start empty, so if something is in there from a previous effort, either delete it or create an empty “Export2” label.
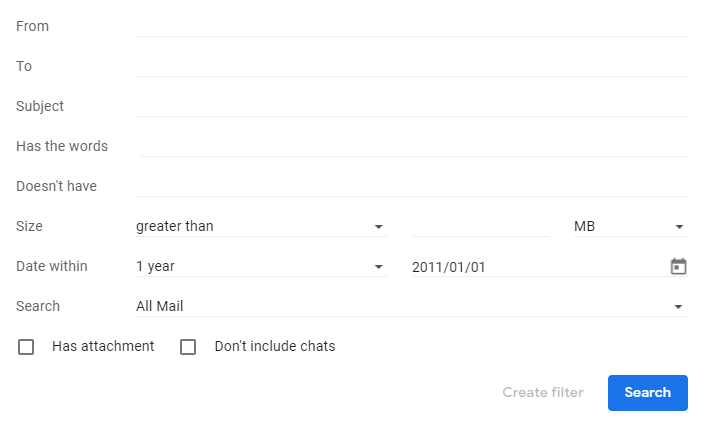
3. Start a search of all mail within a year of your oldest. Go through each page, selecting all and moving those messages to the “Export” label. You should use a search because Google wants to throw new messages into the mix if you’re just viewing the oldest mail. You can speed up the process of “select all” by increasing the number of messages visible on a page in your Settings, but I suggest you take the time on every page making sure you’re in the right year timeframe.
4. Go to Google’s Takeout tool:
a) First, deselect all, we only want Mail.
b) Scroll down to the mail product and select it.
c) Click on “All Mail Data Included” and select ONLY the “Export” label we poke about earlier
d) Click “Next Step”
e) You’ll get delivery options. I’d choose the defaults except for file-splitting. I like to expand the size so I get only one file. Make sure you ask for “Export Once.” Depending on what you’ve requested and how much, the link or file will be created and you’ll be notified.
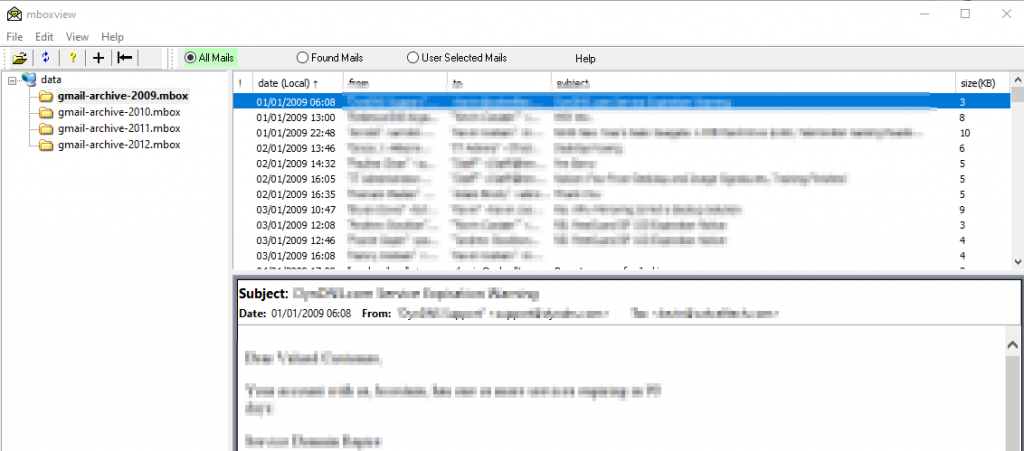
5. Pick up the Simple Mbox Viewer tool, It’s open-source. If you’re updating from a previous version, you’ll be prompted to recreate indexes. Be sure to donate to the developer for his great tool, I’m sure he’ll appreciate any amount.
6. Once Google notifies you, download the .zip file from Google. Extract the .mbox file into a data folder (I suggest a structure of files close to other exports and the “Simple MBX viewer.” In my case, when I’ve extracted the .mbx file, I rename it to “gmail-archive-2011.mbox” so it lines up with previous exports. The folder looks like this:
\email-archive
– mboxview.exe (and other program files)
->\data
–> gmail-archive-2012.mbox (and other mbox files)
Go ahead, open it up, search, make sure it’s all there.
7. With the archive good, go back to the “export” label and delete all that, clear your trash and enjoy the free Google Space.
You’ll want to go through this process every year. Archiving mail regularly like this keeps you aware of the space used and organized enough to keep local backups of this data as it grows. Having a searchable cloud-based mail archive is cool, but isn’t it better to archive this stuff for free?