Bridge networking in docker: Assigning static IPs on creation
Docker has been an amazing tool for deploying applications fast, but as I have come to need containers that interacted with each other, the networking aspects have brought some major challenges. I wasn’t a fan of docker’s documentation either. It doesn’t explain the nuances of this process. Namely, I wanted to know how to bring up a container and right from the start assign an IP address. Let me show you how that’s done.
I should mention that the below examples apply to Docker version 19.03.13. If you use Portainer (the current version is 2.0.0), you may need to adjust some things (especially when creating a stack).
Docker Create and Run
With these two more simple tools, we never really see examples of network assignments. The following are how you’d assign an IP address of 10.0.0.17 to a container using either run or create. The “docker guts” include all the statements such as name, volumes and environment variables. The “-d” switch makes the container run in the background.
docker run -d \
... docker guts
--network=YourNetwork \
--ip 10.0.0.17 \
image/imagename
docker create \
... docker guts
--network=YourNetwork \
--ip 10.0.0.17 \
image/imagename
Docker-Compose
This one is a bit more challenging due to how docker-compose uses whitespace. I’ve recreated a basic docker-compose.yml file with whitespace as an image below. You’ll notice that the structure of indentations is strict. The “services:” statement is indented from the “version” statement and so on.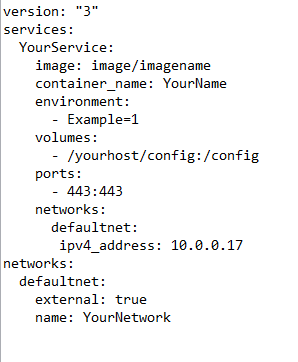
When moving down to “networks:” the indentation falls back to root-level and the statements below continue. In my experience, this structure was tricky to get right and Docker would throw all sorts of errors until it was right.
To see it in pure, copyable text form, see this pastebin. I’m sure, in time, this full process will become easier to work with.