Basics: Taking a Screenshot with Your Computer
 Taking screenshots is one of the most common things you’ll do with your computer. You may want to record something you can’t easily save, and want it clearer than taking a picture of your monitor would yield. Screenshots are also great for grabbing an error on your screen and sending it to a support person for help. In some cases, you can use them to tell a story. Today’s Basics article is about taking screenshots.
Windows 7/8
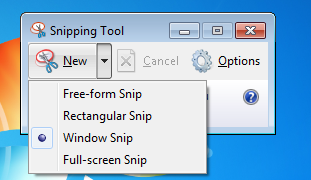
Use the Snipping Tool. This small screenshot utility is included with most versions of Windows (Not Basic or Starter editions, for some reason). This small tool can take capture a free-form area, a selection, a window, or the entire screen.
Here’s how you use the snipping tool:
1. Find and run the tool. You can use the Start Menu search to look for “Snipping Tool” to find “SnippingTool.exe” and run that. In Windows 8+ search through “All Apps”.
2. With the tool open, it will automatically try to take a screenshot. You can click on “New” to adjust the kind of screenshot you want.
3. When ready, click anywhere on the screen (away from the Snipping Tool’s main window).
4. You’ll see your screenshot in a larger window. Simply click the menu “File” then “Save As…” to save your image. Choose a compressed format like JPEG and save the file. You can now send this file via email (if needed).
Mac OS X
OS X has a set of highly functional screenshot options that are very easy to use. The best way to do this is via the simple keyboard shortcuts available.
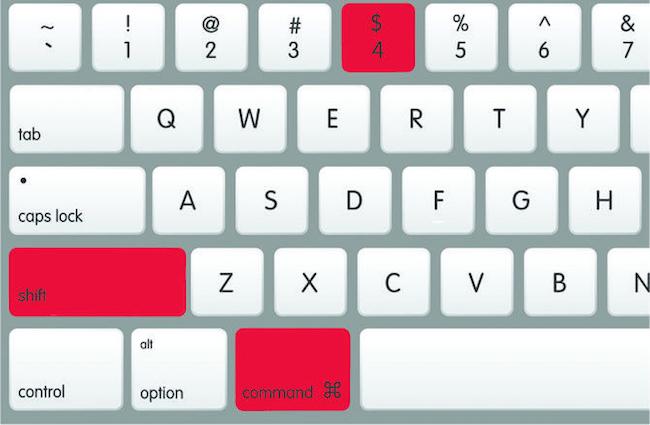
Here’s how to get a screenshot on most OS X versions: 1. Choose what type of screenshot you want. Each type has a keyboard shortcut. Command-Shift-3 will give you the entire screen, Command-Shift-4 will allow selecting an area, and Command-Shift-4 - then space will allow you to select a window. 2. Once you use the corresponding shortcut key, the screenshot will automatically be saved to your desktop (by default) with a file name similar to this: “2015-04-29 at 11.02.35 AM.png”
Naturally, OS X includes a number of options to control the output of this process including the save location, the file name, and even format.
Windows XP
Unfortunately, there is no built-in screenshot tool for Windows XP. To take a screenshot, you’ll need an external utility or using the PrintScreen key. Here’s how:
1. Press the “Print Screen” key on your keyboard; an image of the entire screen will be copied to the clipboard.
2. Open Microsoft Paint, which is built-in to Windows.
3. Use CTRL+V to paste the clipboard contents into Microsoft Paint.
4. Save this file as JPEG, and send it out as needed.